-
RaspberryPi로 Golang 서버만들기 - OS 설치하기 [1]Go 2021. 1. 2. 23:29728x90반응형
<준비물>
1. 라즈베리파이 - Raspberry Pi 4 Computer Model B 2GB RAM
2. SD 카드
3. C타입 충전기
4. 랜선
5. sd카드 리더기 - sd카드를 부팅디스크로 만들때 필요하다. (SD카드리더기가 있는 노트북이 있는경우 노트북을 이용하면 된다.)
6. micro hdmi 선 - 처음세팅할때 ssh허용을 위해 한번은 무조선 필요하다. (자신의 모니터와 맞는 선을 준비해야된다)
RaspberryPi 구매링크: https://coupa.ng/bOPZga
SD카드 구매링크: https://coupa.ng/bOQaLB
SD카드리더기 구매링크: https://coupa.ng/bOQBId
micro hdmi to hdmi선 구매링크 (자신의 모니터와 맞는 선을 준비해야된다): https://coupa.ng/bOQB9j
https://www.raspberrypi.org/software/operating-systems/#raspberry-pi-os-32-bit
Operating system images – Raspberry Pi
The Raspberry Pi is a tiny and affordable computer that you can use to learn programming through fun, practical projects. Join the global Raspberry Pi community.
www.raspberrypi.org
Raspberry Pi OS with desktop and recommended software 설치
라즈비안이랑 software들이 포함되 이미지이다.
설치후 압축을 푼다.
Win32 disk imager를 설치한다. google에 검색하면 바로 나온다.

Win32 disk imager를 실행하고 이미지를 선택하고, 부팅디스크로 만들 디스크도 지정한뒤 Write를 누른다.

만든 SD카드를 라즈베리파이에 넣고
모니터와 연결한뒤 전원을 킨다.
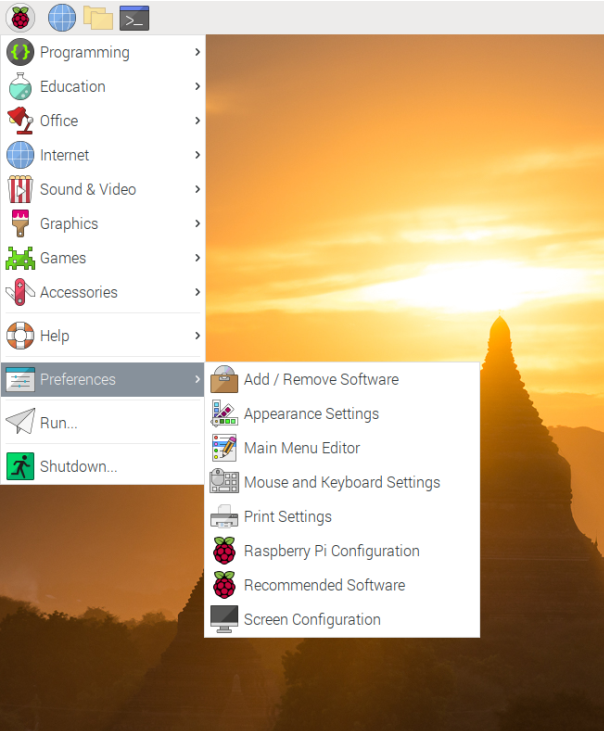
RaspberryPi -> Preferences -> Raspberry Pi Configuration
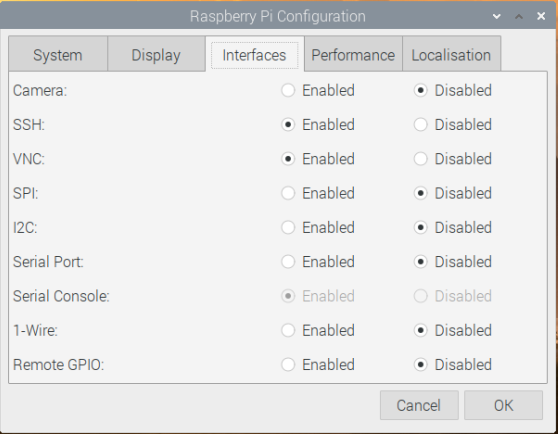
Interfaces -> SSH -> Enabled
설정이 완료되면 리부팅한다.
PC로 돌아와 명령 프롬프트 창을열고
ssh pi@192.168.0.100를 입력한다. (뒤에는 라즈베리파이의 IP를 입력한다.)
※ 만약 이런 문제가 생긴다면

ssh-keygen -R 192.168.0.100을 입력한다. (뒤에는 라즈베리파이의 IP를 입력한다.)

이제 root로 접속할 수 있게 설정해야된다.
sudo passwd root비밀번호설정을 한다. (passwd: password updated successfully)
sudo vi /etc/ssh/sshd_configsshd_config설정에 들어가서 아래와 같이 수정한다.
# Authentication:

#LoginGraceTime 2m
PermitRootLogin yes
#StrictModes yes
#MaxAuthTries 6
#MaxSessions 10
service sshd restart서비스를 다시시작하고 root로 접속하면 설정이 완료된다.

root@raspberrypi로 접속되면 된다.
728x90반응형'Go' 카테고리의 다른 글
RaspberryPi로 Golang 서버만들기 - MariaDB 설치하기 [6] (0) 2021.01.03 RaspberryPi로 Golang 서버만들기 - Postman [5] (0) 2021.01.03 RaspberryPi로 Golang 서버만들기 - Echo Framework [4] (0) 2021.01.03 RaspberryPi로 Golang 서버만들기 - visual code ssh 연결하기 [3] (0) 2021.01.03 RaspberryPi로 Golang 서버만들기 - go설치하기 [2] (0) 2021.01.03